Lighting for Jewelry Photography: Best Techniques for Showcasing Your Stunning Jewelry Collection
Capturing the beauty of your jewelry collection is important for any young professional woman. Proper lighting for jewelry photography helps highlight the details and sparkle of each piece. By learning how to use light effectively, you can showcase your favorite items and impress potential buyers or friends. In this guide, we share simple tips to help you care for and maintain your jewelry while making it shine in photographs.
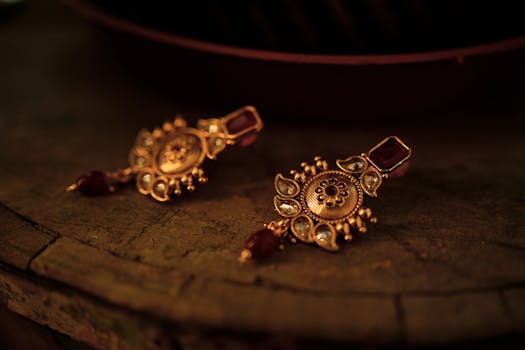
Capturing the Sparkle
Good lighting makes your jewelry shine. When you take a photo in perfect light, your pieces look more beautiful and appealing. This is crucial if you want to showcase your jewelry collection or attract potential buyers. Mastering lighting for jewelry photography is not just a nice-to-have skill; it’s essential for any young professional woman passionate about jewelry care and display. In this guide, you will learn practical tips for lighting your jewelry photos effectively.
Understanding the Role of Lighting in Jewelry Photography
Proper lighting can truly elevate the beauty of your jewelry. It helps show off the colors, details, and intricate designs of each piece. Think of lighting as the makeup that highlights your jewelry’s best features—like a good highlighter would do for your cheekbones!
Key Benefits of Proper Lighting
Enhances Colors: Good lighting brings out the true colors of the gemstones and metals. With the right light, a sapphire can look as blue as the ocean while a diamond can sparkle like stars.
Reduces Shadows: Shadows can hide the beauty of your jewelry. Proper lighting minimizes harsh shadows, making every detail visible.
Highlights Intricacies: Unique designs and details are best showcased under the right lighting conditions, allowing admirers to appreciate craftsmanship.
Lighting also plays a role in lighting for jewelry displays. Just like in photography, the way you light your jewelry in a store can make a big difference. Bright, natural light can attract customers, while dim lighting might keep them away.
Best Lighting Techniques for Displaying Jewelry
To get the most out of your jewelry photography, you need to know the best lighting techniques. Here are some techniques that can make your jewelry pop:
1. Diffused Lighting
Diffused lighting is soft and even. It minimizes harsh shadows and makes your jewelry look dreamy. You can achieve this by using a softbox or even a white curtain. Think of it like cloud cover on a sunny day—soft and flattering!
2. Backlighting
Backlighting creates a glowing effect. This technique highlights the shapes and colors of your jewelry. To use backlighting, position your light source behind your jewelry. This works wonders for transparent stones, as it enhances their brilliance.
3. Reflectors
Reflectors bounce light back onto your jewelry. You can use white cardboard or even a mirror. This technique fills in shadows and adds extra sparkle. It’s like having a cheerleader for your jewelry, making sure it shines its brightest!
Actionable Tip
Experiment with different angles and light intensities. Moving the light closer or further away can change the effect dramatically. Take several shots and see what works best for each unique piece.

DIY Solutions – How to Create a Lightbox for Jewelry Photography
If you want to take stunning jewelry photos without spending a lot, a lightbox is a great solution. Here’s a step-by-step guide on how to create a lightbox for jewelry photography using materials you likely already have at home.
Step-by-Step Guide
Gather Materials: You’ll need a cardboard box (like a shoe box), white tissue paper, tape, scissors, and a light source (like a lamp).
Cut the Box: Cut out the sides of the box, leaving a frame. This will create openings for light to come in.
Attach Tissue Paper: Tape the white tissue paper over the openings. This diffuses the light, making it soft and even.
Set Up Your Light Source: Position your lamp on either side of the box. Make sure the light shines through the tissue paper.
Place Your Jewelry: Set your jewelry inside the box. Try to keep it as centered as possible for the best shot. To enhance your photography further, consider using tips for shooting reflective jewelry](https://www.knowingring.com/articles/tips-shooting-reflective-jewelry-macro-lenses/) to create stunning images that truly capture the essence of each piece.
Visual Diagrams
Here’s a simple illustration to help you visualize the setup:

Budget-Friendly Angle
Creating your own lightbox is perfect for young professionals on a budget. You can achieve impressive results without a high price tag. Plus, it’s a fun DIY project!
Advanced Tips for Consistent and Professional Results
Once you have your lightbox set up, you can start to think about advanced tips for getting consistent results.
Lighting Adjustments
Different types of jewelry may require different lighting. For instance, gemstones often need softer light to show off their colors, while metal pieces can look great under brighter lights. Think of it like dressing for the occasion—different styles call for different outfits!
Equipment Recommendations
Consider using a camera with adjustable settings. A DSLR camera is great for jewelry photography. Look for features like:
- Macro setting: This allows you to focus closely on small details.
- Flash options: Sometimes, an external flash can help brighten your photos without washing them out.
- Soft boxes: These can create a professional lighting setup at home.
Real-Life Examples
Many photographers have found success using these techniques. For instance, one photographer used a DIY lightbox and natural light to photograph her vintage jewelry collection. The results were stunning and led to increased sales!

Shine with Confidence and Creativity
By now, you should understand the importance of proper lighting in jewelry photography. You’ve learned about the best techniques, DIY solutions, and advanced tips that can elevate your photography skills.
Don’t hesitate to try out the DIY lightbox project. You might find it’s the perfect way to showcase your jewelry. Share your success stories on social media, and don’t forget to subscribe for more expert tips. Embrace these techniques to celebrate and care for your stunning jewelry collection!
FAQs
Q: How can I balance highlights and shadows effectively when shooting shiny jewelry in a DIY lightbox setup?
A: To balance highlights and shadows when shooting shiny jewelry in a DIY lightbox, use diffused lighting by positioning lights on either side of the setup and placing a diffusing material, like wax paper, in front of the main light source. This helps to evenly illuminate the jewelry while minimizing harsh reflections and shadows, creating a more balanced and appealing image.
Q: What steps should I take to select the right lighting gear that really brings out the details and sparkle in my pieces?
A: To select the right lighting gear for showcasing your jewelry, invest in daylight or natural light bulbs for cooler, whiter illumination, and use three small desk lamps positioned at different angles to diffuse light effectively. Additionally, consider using a photography tent or a makeshift setup with translucent materials to minimize harsh shadows and enhance the sparkle of your pieces.
Q: What common lighting issues have you seen with reflective jewelry, and how do you tackle them to avoid unwanted glare?
A: Common lighting issues with reflective jewelry include unwanted glare and harsh shadows that can obscure details. To tackle these problems, use diffused lighting sources, such as daylight bulbs or softbox setups, and adjust the angles of the lights to minimize direct reflections on the jewelry’s surface.
Q: How can I experiment with different light positions and diffusers to enhance the overall visual appeal of my jewelry for online displays?
A: To enhance the visual appeal of your jewelry for online displays, experiment with positioning your lights at various angles to see how they affect shadows and highlights on your pieces. Use different diffusers, such as wax paper or Mylar, to soften the light and reduce harsh reflections, allowing you to capture the sparkle and detail effectively.
Additionally, consider exploring styling jewelry photography techniques to further enhance your skills and presentation.